

You can install the T-CAT P as many times as you want on as many devices and browsers as you need. You only need the .p12 or .pfx file of the T-CAT P. You got this file when you downloaded the certificate.
When you locate the file you just have to move it to the new device and you can install it
If you do not have the file, you will first need to create a copy of the certificate using an export. Below you will find the steps to follow to perform the export and import, depending on which browser you currently have the certificate installed in.
EXPORT
To export a software certificate from the Mozilla Firefox browser, you must follow the following steps:
Step 1 : Access Tools - Settings - Privacy and Security - Show certificates
Step 2 : choose the certificate to export, from those that will appear in the central part of the window below in your browser, and click on " Make a copy ".
Step 3: Specify the name and location of the p.12 file that will be created on the computer with the certificate.
Step 4 : once you have chosen a password
Step 5 : Finally, a message will be displayed that reads “ export completed successfully ”.
Note: In case you cannot complete the export process because an error of the type "An error occurred for unknown reasons saving the PKCS #12 archive backup" appears, check that the certificate you want to export is in software (not recorded on a card-type device) and you have the public key and private key installed in the browser.
IMPORT
A file with the extension p.12 will have been created on your computer that contains the digital certificate that you can copy to a pen-drive to install on another computer using the " Import " option. You will find this by accessing Tools - Settings - Privacy and Security - Show certificates.
Remember that when making the import you will have to enter the password defined in step 4 .
EXPORT
To export a digital certificate in software from the Google Chrome browser, you must follow the steps below:
Step 1: Access the button from the upper right. Option " Settings ">Privacy and Security>Security> Manage certificates .
Step 2 : This window displays the certificates installed on your computer under the " Personal " tab. Select the certificate you want to copy and click the "Export" button. At this point the wizard for exporting digital certificates will open.
Important note: in the "Personal" tab of this window, both the certificates installed in the repository with the public and private key ( whole certificate ) are displayed, as well as the certificates for which we have only their public key , which means that we cannot identify or sign with them, or the private key is stored with some external device (eg: a T-CAT card). Likewise, the steps described in this FAQ will only serve to export the certificates of the first group ( entire certificate installed on the computer )
Step 3 : At this point, a wizard opens to export the certificate that we have to follow:
Step 4 : In the next image it is important to select the " Export private key " option, otherwise you will only be creating a file with the public key that will not be used for identification or signing. If you cannot select this option, it means that the selected certificate cannot be exported in its entirety because it is not a certificate in software installed on your computer with a public and private key (as explained in the note in point 2).
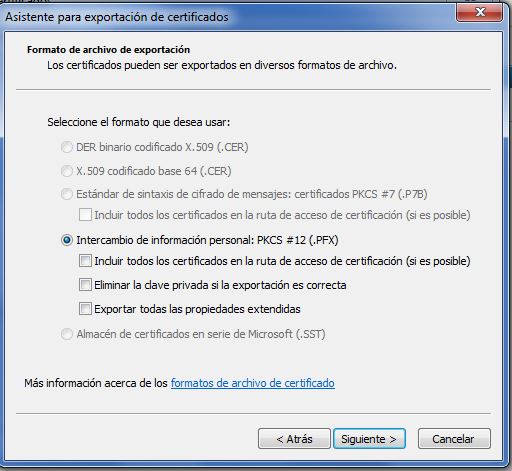
Step 5 : in the image below you will have to define a password that you will need when installing the file with the certificate you are creating, on another device, or to sign directly from the file, without the need to install the certificate on the computer, as long as the application allows you to do so. Therefore, it is very important that you remember the given code.
Step 6: You must then define a location to save the file with the certificate on your computer and give it a name.
Step 7 : Finish the wizard and you will have created the .p.12 or .pfx file on your computer.
IMPORT
Once the copy of the certificate has been made, you can save the file on a mobile device, a memory stick, a diskette, etc., following the following steps:
Step 1: Access the button from the upper right. Option " Settings "> Privacy and Security> Security> Manage certificates .
Step 2: Click "Import". The Certificate Import Wizard opens," click Next, and select the certificate file. If you click "Next," it prompts you for the password with which the certificate was previously protected. Once indicated, of the three options that the wizard allows, leave them all checked and select "Next" until the wizard tells you that the import was successful.
Every time you want to use the T-CAT P on other equipment you will have to perform this operation.
It is optionally possible to protect the T-CAT P with a PIN during the process:
- Check " Enable secure private key protection".
If you enable this option, the system will warn you every time an application needs to use the private key of the certificate (identification or signature).
- Once the previously mentioned option is marked, if you continue the wizard you will reach the "Finish" button and then you will see the following screen, where you will have to click on "Security level".
- On the next screen mark "Alt" and continue the wizard.
- Finally, indicate the code you want to use for the use of the certificate and Finish the import wizard. Your certificate is now protected with a PIN!
EXPORT
If you have a software certificate installed on your Mac, you can export it by following these steps:
step 1 Go to Key Access > Login > my certificates.
step 2 Select the certificate we want to export, we will see that it shows us that it has a private key.
step 3 Click the right mouse button on the private key of the certificate, a window will open with several options, we must select "Export".
step 4 A window will open asking us what name we want to save the certificate under and in what location; we will indicate the name and where we want to save the certificate leaving the default file format: .p12.
step 5 A window will open asking us to enter a password that will be used to protect the exported certificate file; this password will have to be entered when we want to install the certificate from the resulting file. If we leave it blank, the file will not have a password.
step 6 To complete the export, a window will open asking us to enter the login password.
IMPORT
step 1 Double-click on the file p.12 and select from the "keychains" dropdown: Login.
step 2 Press the "Add" button to install the certificate.
Note: Please note that the padlock icon under Keychains - Login must be open in order for the idCAT certificate to be installed correctly.
The system will ask you for two passwords: the system administrator first and the download code (password) afterwards.
Once done, you will have the idCAT certificate installed in the MAC repository (Safari and Google Chrome). For Mozilla Firefox you need to import the .p12 or .pfx file into the browser itself. To do this, go to Tools - Settings - Privacy and Security - Show certificates - Import - a wizard will open to perform the installation.
Note: We recommend that you keep the .p12 file as a backup.
Important! For the idCAT to be detected as trustworthy on your MAC, access the "Keychains" folder - "Certificates" tab - EC-ACC--> press "get information" and once here, by expanding the "trust" menu, indicate : "trust always"
NOTE: When doing this action the system will ask you for your MAC credentials.
Once these steps have been completed, if you go to "keychains" - tab "My Certificates"--> your name (idCAT) you will see that it already appears as trusted.
EXPORT
Step 1: With the Microsoft Edge browser go to the buttonfrom the top right>Settings>Privacy, search and services tab>Security. At this point click on the "Manage Certificates" button and then the " Personal " tab.
Step 2: select the certificate with your name and issued by EC-Sector public and click the "Export" button.
Step 3 : Select the " Export Private Key " option
Step 4 : Next you will need to define an export password that you will need when installing the certificate file on the new device.
Step 5: Finally set the file location and name. You already have the T-CAT P exported.
IMPORT
Step 1 . Go to the computer where you want to install the certificate and paste the file.
Step 2. Go to the button ![]() from the top right>Settings>Privacy, search and services tab>Security. At this point click on the "Manage Certificates" button and then the " Personal " tab, click on "Import" and follow the wizard.
from the top right>Settings>Privacy, search and services tab>Security. At this point click on the "Manage Certificates" button and then the " Personal " tab, click on "Import" and follow the wizard.
Remember that it will ask you for the export password you set.
Once the import is complete, you can now use your T-CAT P on this browser and computer.
T-CAT P cannot be downloaded from mobile devices such as phones or tablets, but you can make a copy and install it where needed. Consult the manuals for iPhone/iPad , Android , Windows Mobile .
